


Show Your Friends You Care!

Hey Everyone, I have begun to add these little buttons so you can easily share my posts to your favorite sites. I would really appreciate you spreading the word to others so this place can gain a wider audience.
-Thanks!


 Video
Video
Hangover Part 3 Official Trailer

Kick-Ass 2 Official Red Band Trailer
 Video
Video
Super Metroid – Depths of Tourian
Watch this photoshop Jedi turn a 16-bit image into a hi-res Masterpiece
 Video
Video
Call of Duty Black Ops – Tomahawk Toss is his Death Blow
 Video
Video
Skyrim and the Skilled Archer
Transistor: The New Game From The Creators of BASTION
![]()
![]()
![]()
![]()
![]()

How To Create A Recovery Flash Drive For Windows 8
Whenever Windows 7 had problems, you could just insert your Windows 7 installation CD and run its recovery tools. Most Windows 8 users, however, don’t have an installation CD. Here’s how to make a recovery flash drive, and, if you bought a Windows 8 PC, delete the space-hogging recovery partition that came with it.
If you have a regular hard drive, the recovery partition probably isn’t a big deal, but if you have a smaller SSD, for example, the recovery partition can waste a lot of space—sometimes up to 15GB or higher. If you built your own computer, you won’t have a recovery partition, but having a recovery flash drive can still be very handy to have around. Luckily, it’s easy to make:
1.) Grab a flash drive that’s at least 256MB, or at least as large as your recovery partition if you have one. Plug it in and make sure it’s empty, since you’ll need all that space for your recovery files.
2.) Head to the Start screen and type create a recovery drive. Click the “Settings” option in the right sidebar, then choose the recovery drive option in the search results.
3.) Go through the recovery drive wizard. If your computer came with Windows 8 preinstalled from the manufacturer, you’ll have an option to “Copy the recovery partition from the PC to the recovery drive.” This will include the data on your manufacturer’s recovery partition.
4.) Choose your flash drive from the list and click Create. If you’re prompted to delete your recovery partition (if you have one), delete it. You can free up a lot of space if you do.
Now, if you ever have problems with your computer, just plug the flash drive in and boot from it. You’ll be able to run Windows’ recovery tools, as well as your manufacturers’ when applicable. Plus you’ll have freed up quite a bit of space!

Dapper Desktops – With RainMeter
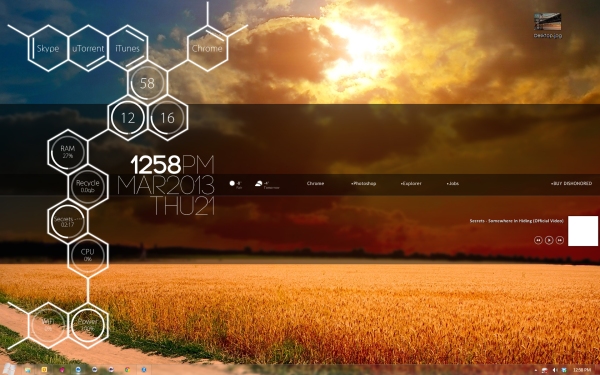
Amazing Rainmeter Desktop
Take a look at the amazing widget/theme based desktop created with Rainmeter and a select amount of external extensions:
The Harvest Wallpaper
The Rainmeter system configuration and monitoring utility for Windows
The Encoded skin for Rainmeter for the time, date, and day of the week displays
The Enigma suite for Rainmeter to create the center-screen taskbar, sunrise/sunset info, and shut down shortcut
The Omnimo suite for Rainmeter to create the multi-shaded background
The All-In-One Player for Rainmeter for the “Now Playing” widget under the center taskbar
The OrganiC2 skin for Rainmeter to create the system monitors at the upper left
The Drop theme for Windows to customize the window displays
Once you download and acquire the various elements, be sure to install them all before getting into customizing as a few of them will load their own theme upon installation which could cause you to have to start fresh if you have been doing any customizing prior to installing everything. This application is very easy to use once you understand it, but you will need to play around with its functions and features for a while before you will understand how everything works.
The whole thing looks really sharp when it’s put together, but it’s also worth noting that you could lift any specific part of this desktop that you like and apply it to yours with minimal effort. The Drop theme for Windows is specifically good looking.
If you’re tweaking with Rainmeter and need a little help, please check out a few of these helpful videos:

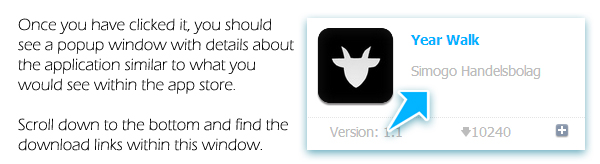
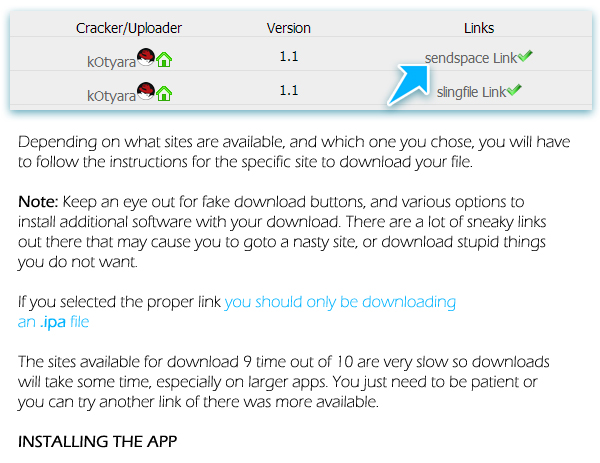
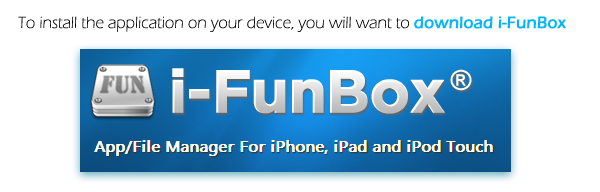
Download and Install iOS Apps From Your PC


How to Use a Gamepad for Any iOS Game
The iPhone and iPad are fantastic gaming devices, but unfortunately a lot of games still try to emulate gamepads with onscreen buttons on the touch screen and it just doesn’t work that well. Thankfully, a jailbreak app called Blutrol lets you turn a handful of different gamepads into controllers for any game with touchscreen buttons. Here’s how to set it up.
We’ve talked about turning your Android or iOS device into a portable retro game arcade before, and while you can still use those tricks, this method makes it so you can use a bunch of different controllers for any game on iOS, not just emulators and the handful of games that support controllers. While it might sound a little fishy, it works incredibly well and isn’t that hard to set up.
What You’ll Need
You don’t need much to make this work, just a single app, some games, and little patience:
– jailbroken iPad, iPhone, or iPad Touch.
– Blutrol ($6.99) from the BigBoss Repository on Cydia.
– A PS3 Dualshock controller (note: you also need the SixPair tool for Mac or the SixaxisPairTool for Windows to pair the PS3 controller with your iOS device), Bluetooth Keyboard, Wiimote, Phonejoy, iCade, iControlPad, or iMpulse controller.
That’s it. Now we just need to get your controller paired up with your device and working with your games.
Pair You Gamepad with Your iOS Device
First things first, we need to get the gamepad paired with your iOS device. We’ll be using a PS3 controller, which takes an extra step. So, if you’re using a different gamepad, skip this part.
How To Setup A PS3 Controller
The PS3 controller takes one additional step to get it working with your iOS device, but it’s not complicated, and you only have to do it once. When you’re done, your controller is paired with your iOS device every time.
On Windows
Download and run SixaxisPairTool.
Connect your iOS device to your computer with the lightning cable or 30-pin cable.
Connect your PS3 controller to your computer with a USB cable and wait for the Bluetooth address to come up.
Once it’s paired with your computer, get your iOS device’s Bluetooth address by heading into Settings > About > Bluetooth. Enter that address into SixaxisPairTool and click update. Now your iOS device should be linked to your PS3 controller.
On Mac
Download SixPair Tool and run the app.
Connect your iOS device to your computer with the lightning cable or 30-pin cable.
Connect your PS3 controller to your Mac with a USB cable.
Click the “Pair Controller to iPad” button.
When it’s successful, open Blutrol on your iOS device, tap the controller tab, select the PS3 controller, and tap “Connect.” When it’s connected, you can disconnect the PS3 controller from your Mac.
Now you can select your PS3 controller inside Blutrol as a Bluetooth device (if it doesn’t appear right away, head into Settings > BTStack and select “BTStack” as the active Bluetooth system).
Pair Other Controller to Your iOS Device
Thankfully, other controllers don’t take the extra step that a PS3 controller does. For the rest of the supported devices, just follow the directions for pairing that are included with the device (or just head into Settings > General > Bluetooth and make sure they’re already recognized). Then open the Blutrol app, tap “Controller” and select your gamepad.
Set Up Blutrol for Any Game
Now that your iOS and gamepad are paired up together it’s time to start playing games. Thankfully, this part’s easy too, and you only have to do this once for each game.
1.) Open up the game you want to use the controller for (obviously it makes the most sense to pick a game with onscreen buttons. We’ll be using Sonic CD).
2.) Take a screenshot of the game when the controls are displayed (tap the home button and power button at the same time).
3.) Exit the game and open up Blutrol.
4.) Tap the “Games” tab, and then the “+” sign.
5.) Select the game you just took a screenshot of.
6.) Tap either portrait or landscape (depending on how you took the screenshot), and
7.) select the screenshot you just took.
8.) Tap “Add,” select the controller of your choice, and then tap either landscape or portrait.
You’ll now see your screenshot with your gamepad’s buttons laid over it. Here, you’re essentially assigning a button combination, so when you push a button on the controller, it “taps” the screen for you. Move the gamepad buttons to cover up the on-screen controls however you like (you can also resize the analog stick or d-pad with pinch and zoom). When you’re happy with the setup, tap “done.”
9.) Now open up the game again, and start playing the game with the controller (if it has trouble, just force-quit the game and start over).
That’s it! From now on you’ll be able to easily pair your controller with your iOS device and start playing games. Just don’t tell any of your friends on the leaderboards why you’re doing so well. It also works with any app you want (not just games), so you might be able to come up with some other creative uses.
